
After months of watering, adjusting grow lights, and eagerly waiting for tiny sprouts to emerge from the soil, it is finally time for one of the most exciting parts of gardening: moving seedlings out into the garden!
But successfully growing a garden involves much more than simply transplanting seedlings into the ground and hoping for the best. From hardening off and planning where everything will grow to caring for plants throughout the season, there truly is so much to learn along the way.
I am by no means an expert gardener and honestly feel like I learn something new every year. But over the years, I’ve found a few gardening methods and techniques that have really helped our garden thrive and made the whole process feel more enjoyable too.
So if your seedlings are growing strong and you’re getting ready to move them outdoors, here are a few things I’ve been learning as we prepare and care for our garden this season.
Psst! If you missed the first post in this gardening series, check out The Ultimate Gardening Guide (Part I): Seed Starting & Care, where I share more about starting seeds indoors and caring for seedlings before transplanting them into the garden.
Hardening Off
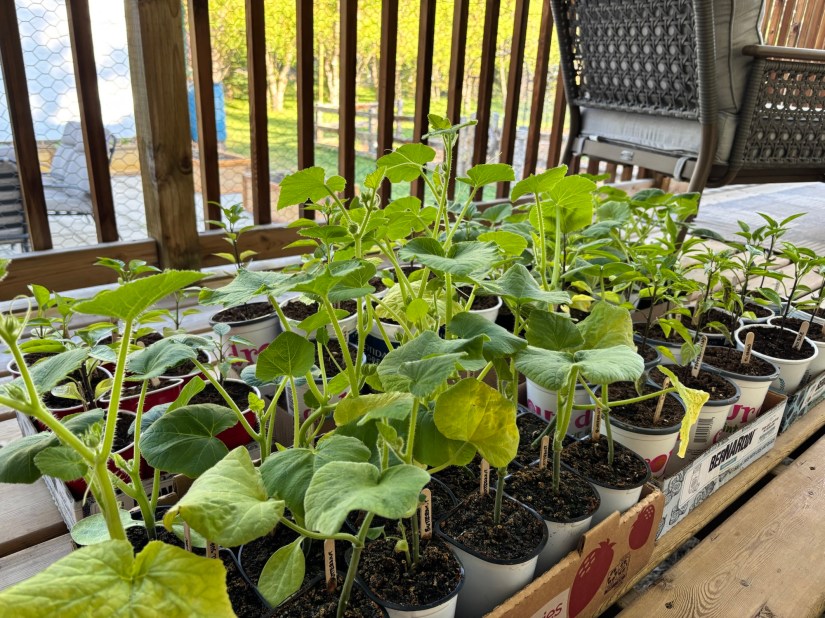
One of the biggest mistakes I made when I first started gardening was assuming seedlings could go directly from their cozy home indoors straight to their final resting place in the great outdoors. I quickly learned that plants need time to adjust to wind, temperature swings, and direct sunlight, otherwise they can become stressed (or even die!).
This process of adjustment is what gardeners call “hardening off”, which helps to gradually introduce young seedlings to their new environment outside. Seedlings started indoors are used to stable temperatures, no wind, and indirect or artificial light. Hardening seedlings off before transplanting them helps to ease them into their new life outside and drastically reduces the risk of shock or stress when transplanted.
Seedings generally require at least seven days to harden off, but it may take up to 14 days depending on the weather and the type of plant. A basic hardening off schedule typically looks like this:
- Days 1-2: Place seedlings outdoors in a sheltered, fully shaded spot with no direct wind for 1 to 2 hours. Bring them back inside.
- Days 3-4: Place seedlings in partial shade and increase their outdoor time by 1 to 2 hours each day. Continue to bring them inside.
- Days 5-6: Expose seedlings to a few hours of direct morning sunlight. If nighttime temperatures are safely above your plant’s minimal thresholds (typically 7-10°C / 45-50°F), seedlings can be left outside overnight.
- Days 7+: Leave seedlings outside in full sun all day and night to ensure they are fully toughened up before planting.
Over the years, there are a few things I’ve found to be helpful as I harden off my seedlings. First, it is important to keep an eye on the weather and adjust the timeline for hardening off accordingly. If it’s extremely hot, cold or windy outside, it is usually best to keep seedlings indoors until more mild weather is expected. I’ve also found it helpful to set a timer or alarm to remind myself to bring seedlings back inside, as it is far too easy to lose track of time or forget about my seedlings entirely. Lastly, ensure seedlings are well-watered as their soil tends to dry out much faster outdoors.
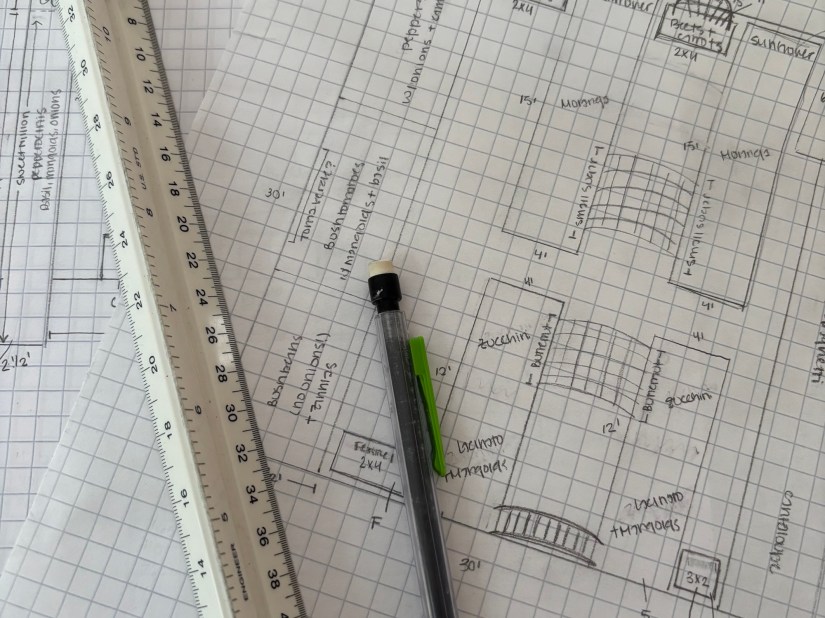
Making a Plant Plan
Once seedlings are hardened off, it’s time for one of the most exciting parts of gardening: planting plants! But how do you know where to actually plant them all? Exactly where and how to plant your seedlings depend on the specifics of your particular garden and what you are hoping to plant, but over the years there’s one thing that’s helped me figure out where to plant what.
Before I plant my seedlings out into the garden, I generally make what I like to call a “plant plan” for our garden. I first take an inventory of the types, varieties, sizes and quantities of seedlings I am planning to plant and then think through or research what each will need to grow (i.e. spacing, sunlight, soil, and support requirements).
For some plants like our squashes and pumpkins, I know that they will grow best in our big in-ground garden, as they have huge leaves and need lots of room to spread out. For other plants like tomatoes, they will do best growing with more controlled soil conditions, so I generally plan to plant these in one of our raised beds. Vining plants like our indeterminate tomatoes or our snap peas grow best vertically and will need to be trellised, so I plan to plant them somewhere where their trellises won’t shade the other plants around them.
Before finalizing your plant plan, it may also be helpful to observe your yard throughout the day and ask:
- Which areas get the most morning sun?
- Which areas get the most afternoon sun?
- Which spots dry out quickly?
- Where does water tend to pool?
From there, sketch out a bird’s eye view of your garden and begin to brainstorm about where each plant may grow best. It may take a few iterations to get your plant plan just right, but don’t despair. It’s all a part of the process and soon you will have a plant plan to work from!
For a look at what we’re planting in the garden this year, check out What We’re Planting: A Peek at Our 2026 Garden Plans.
Companion & Intensive Planting
For the last few years, I’ve been trying to view my garden more as a whole, living ecosystem and have found it fascinating to learn more about how plants can truly help one another thrive. I am by no means an expert on this and feel like I learn something new every year, but I have been experimenting more and more with both companion and intensive planting methods and it’s been so incredibly fun.
One of the things I’ve been learning is that some plants grow better together and can help deter pests, improve pollination and even improve plant health for one another. If you’re interested in experimenting with companion planting, here are a few good pairings to try:
- Tomatoes & Basil
- Carrots & Onions
- Lettuce & Radishes
- Cucumbers & Nasturtiums
- Beans, Corn & Squash
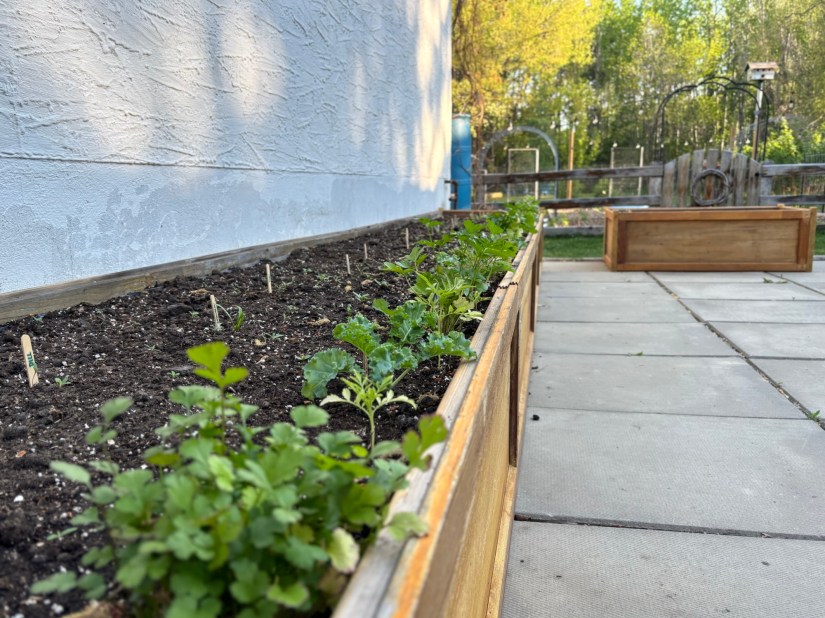
I’ve also been learning about intensive planting and how it can be a great way to maximize space in the garden, help with water retention and reduce the growth of weeds between plants. For the last several years, I’ve used intensive planting methods in our raised beds, where we grow our tomatoes, greens, herbs, and some flowers, and it has worked wonders to keep the weeds at bay and the soil moist, even in the heat of summer. One thing to note is that intensive planting does require regular pruning and harvesting to help promote proper airflow and avoid overcrowding.
If you’re curious to learn more about companion or intensive planting, an amazing resource for me has been following Nicole Burke’s Gardenary on Instagram or checking out the wealth of information on their website.
Caring for Plants Outdoors
So your plant babies are outside and it’s time for them to do their thing and grow. And for the most part, they will and it is absolutely wonderful and even miraculous to watch them grow into fully mature plants producing a bountiful harvest. That said, I have also learned that a thriving garden rarely happens by accident. While plants are remarkably resilient, there are a few simple things we do throughout the growing season to help them stay healthy, productive, and strong.
Watering
I have found that one of the best things I can do for my plants is to water them regularly. When it is hot, I generally water our garden in the evening to allow time for the water to penetrate deeply into the soil. While our water comes from our own well, I generally prefer to use water collected in our rain barrels when I can. I also aim to water the base of each plant, rather than their leaves, as this helps to reduce the risk of disease.
Mulching
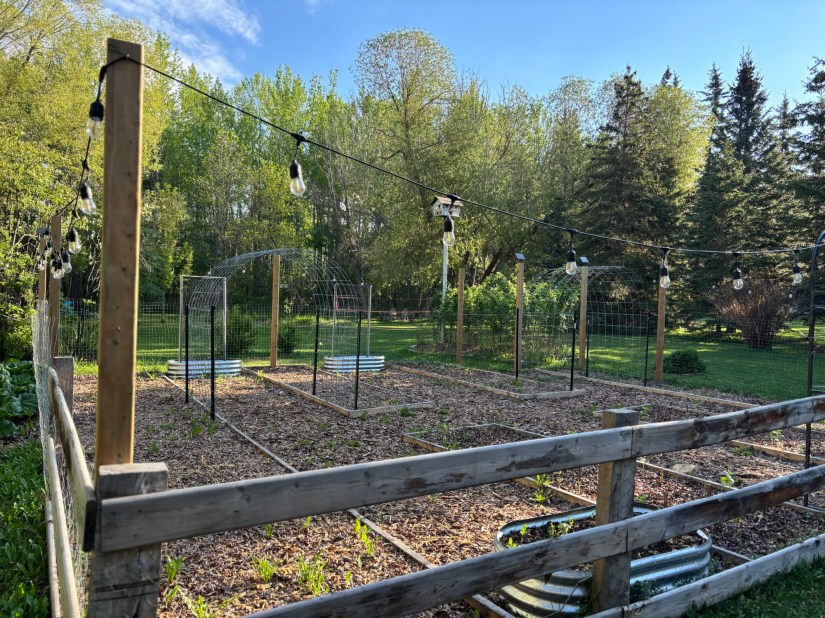
Something new I am trying this year is mulching our in-ground garden beds with dried leaves. In the past, I’ve struggled to keep up with the weeds growing in our in-ground garden beds, especially when the plants are small and so much of the soil is exposed. So this year, I topped each of our in-ground beds with a layer of dried leaves collected from our yard earlier this spring. Already I have seen improvements in water retention for these beds, which is a huge benefit to mulching as well, and I am excited to see what impact it will have on keeping weeds down this summer.
Nourishing
I’m also paying much closer attention to nourishing our plants this year. Before topping our in-ground garden beds with mulch, I added a layer of fresh compost to each bed as well as to our raised planters, lightly raking it into the existing soil. When it is time to plant out our tomatoes, peppers, squashes and cucumbers, I will also add worm castings to each hole to give each seedling a little boost for life in the garden. Lastly, for our tomatoes specifically, I will sprinkle a mixture of dehydrated and finely ground egg shells, banana peels and coffee grounds around the base of each plant regularly for added nutrients.

One of the things I love most about gardening is that there is always something new to learn. While there are certainly helpful techniques and methods that can improve the health and productivity of a garden, part of the beauty of gardening is that every growing season teaches me something different – what worked well, what didn’t, what surprised me, and what I want to try differently next year. Some years our garden flourishes beautifully, while other years bring challenges completely outside of our control. And even then, there is still so much joy to be found in the journey itself.
So whether this is your very first year planting seedlings outdoors or you’ve been gardening for years, I hope this encourages you to keep experimenting, keep learning, and keep growing right alongside your garden.
Happy planting!


1 thought on “The Ultimate Gardening Guide (Part II): Growing in the Great Outdoors”